If your KFXS25RYMS4 refrigerator isn’t making ice, it may be due to various causes, and troubleshooting can help resolve the issue.
First, check water supply problems such as a clogged filter, kinked supply line, closed shutoff valve, or low water pressure can stop ice production.
If the storage bin is full, the KitchenAid KFXS25RYMS4 ice maker will automatically turn off. In that case, empty the storage bin.
If Sabbath Mode is ON, the ice maker will be disabled. To turn off the Sabbath Mode, Press and hold the LIGHT and OPTIONS buttons at the same time for 3 seconds.
Additionally, issues with the ice maker itself, like a faulty mechanism, frozen fill tube, or improper leveling, can contribute to the problem
Furthermore, temperature-related issues, such as a high freezer temperature or a faulty door seal, may also affect ice production.
By addressing these potential causes and following the troubleshooting steps provided, you can work towards restoring your refrigerator’s ice-making functionality.
Table of Contents
KitchenAid KFXS25RYMS4 Refrigerator Ice Production
Before we begin with a troubleshooting guide, here are few key points on KitchenAid KFXS25RYMS4 Refrigerator Ice Production:
KitchenAid advises to wait 24 hours to make the first batch of ice. You should discard this batch. Not only the first batch, KitchenAid recommends discarding the first three batches.
Furthermore, your ice maker can produce 8-12 batches of ice within 24 hours.
And if that is not enough, here is another trick to increase the ice production.
Lower the freezer and refrigerator temperature. With this, you will be able to get more number of batches of ice within 24 hours.
First and foremost, the quality of ice depends on the quality of water supplied. That’s why make sure to use a good quality water supply. Especially, avoid the usage of a softened water supply. The water softener chemicals can damage the ice maker. Not only that, these softener chemicals produce poor-quality ice.
And if it is necessary to use a softened water supply, make sure the water softener is operating properly and is well maintained.
The proper maintenance of the ice storage bin is necessary. Using sharp objects to break the ice will damage the ice bin and affect the ice maker. For this reason, avoid using the sharp objects to break the ice
Last but not least, the ice storage bin is for ice. Do not store anything in it even if there is no ice in the bin.
Kitchenaid Kfxs25ryms4 Not Making Ice
Here are some possible causes for your KFXS25RYMS4 not making ice, along with troubleshooting steps:
Water Supply Issues
- Clogged or dirty water filter: This is the most common culprit. Replace the filter every 6 months, even if it doesn’t look dirty.
- Kinked water supply line: Straighten the line to ensure proper water flow.
- Closed water shutoff valve: Make sure the valve is fully open.
- Low water pressure: Check your home’s water pressure. If it’s low, contact your water provider.
Ice Maker Issues
- Faulty ice maker: The ice maker itself could be malfunctioning. Listen for clicking or humming sounds, which might indicate it’s trying to work. If you hear nothing, it could be dead.
- Turn off Sabbath Mode: When Sabbath mode is on, the ice maker is disabled.
- KitchenAid kfxs25ryms4 ice maker has an automatic shutoff. When the storage bin is full, the ice maker will stop producing ice
- If the KitchenAid kfxs25ryms4 ice maker is off, press the ICE MAKER button on the display screen
Temperature Issues
- Freezer temperature too high: The freezer needs to be at or below 10°F for the ice maker to work properly. Check the freezer temperature setting and adjust if necessary.
- Door not sealing properly: A faulty door seal can allow warm air into the freezer, preventing ice production. Check for gaps or tears in the seal and replace it if needed.
Important Ice Maker and Storage bin
Things to Remember
- KitchenAid kfxs25ryms4 ice maker has an automatic shutoff
- When the storage bin is full, the ice maker will stop producing ice
- If the KitchenAid kfxs25ryms4 ice maker is off, press the ICE MAKER button on the display screen
Here is a warm-up question:
Where is the ice maker and storage bin located?
Well, it is in the upper left-hand side of the refrigerator compartment.
This must be easy to find. Now let’s move to a little more difficult part.
And that is turning the ice maker on and off.
Now don’t get me wrong. It is not difficult but most people are not aware of it. So the simple process of turning the ice maker on and off becomes difficult.
The most important thing you should know is: that the KitchenAid kfxs25ryms4 ice maker has an automatic shutoff. Here is how it works.
As your ice maker is on, it will produce ice. And once the storage bin is full, the sensor will automatically shut off the ice maker. Hence, there will be no new ice production.
To produce ice, empty the storage bin.
Although you are here to learn how to enable your ice maker to produce ice. But at the same time, it will be good to know how to turn off the ice maker manually.
Here are the simple steps:
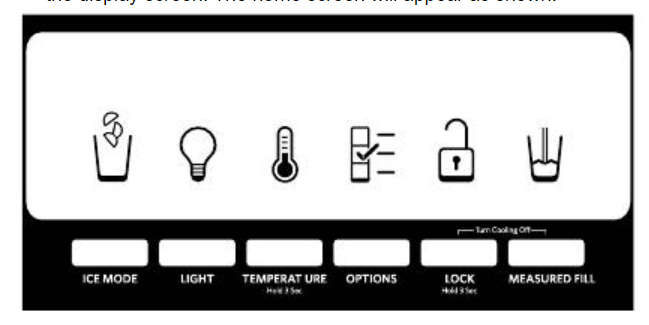
First press OPTIONS to activate the screen.
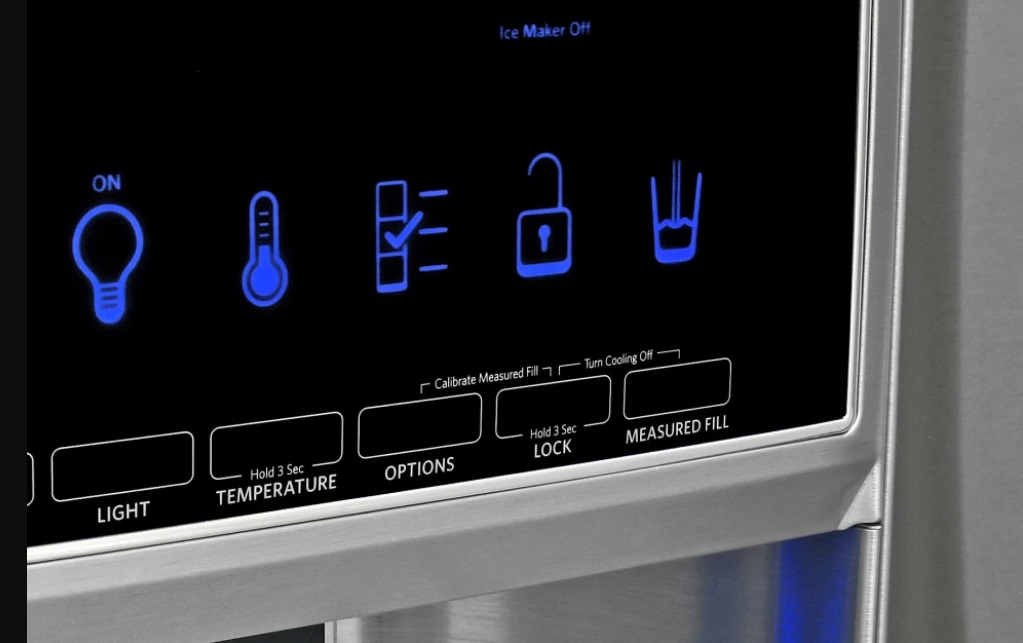
Second, press the ICE MAKER button. It will turn off the ice maker. And you will see the “Ice Maker Off” icon on the display screen. It will flash three times and stay lit.
Now the ice maker will not produce any ice.
To turn the ice maker on, press the ICE MAKER button. It will turn on the ice maker. Also, the Ice Maker Off icon will disappear.
Water Filter
Things to remember
- A clogged water filter restricts water flow to the ice maker, leading to slower ice production or even no ice production at all.
- Mineral build-up from unfiltered water can clog the ice maker’s internal mechanisms, leading to malfunctioning and potential damage in the long run.
As mentioned above the water filter is one of the top causes that affects ice production. If the water filter is not replaced in time, it can damage the ice maker.
Note that the water filter in KitchenAid KFXS25RYMS4 is located in the upper right-hand corner of the refrigerator compartment.
When it is time to replace the water filter, your refrigerator will show the “Replace Water Filter” icon and blink continuously during dispensing.
Once you installed the new water filter, you need to reset the status light. Here are the steps to remove the “ORDER” and “REPLACE” icons.
First, use the OPTIONS button and enter Options mode. Second, press the LOCK icon and start the reset. Lastly, press the MEASURED FILL. This means you confirm to reset the status light.
Fix the Water supply Issue
Things To do:
- Connect the refrigerator to the water supply.
- Turn the water shutoff valve fully open.
- Straighten the water source line
- Requirement: Cold water supply. Uninterrupted water supply.
We all know: that you will have no ice without a water supply. So, have you checked the water supply?
And keep in mind, that connection to a water supply is not enough. You also need to turn the water shutoff valve fully open.
The aim is to provide an uninterrupted supply of water to make ice. With the water shutoff valve fully open, you provide an uninterrupted water supply to the ice maker.
That’s not all.
We also suggest you check for any bends and twists in the water supply line. Because this can significantly reduce the water flow.
Fix Water Pressure Issue
Things to keep in mind:
- Water pressure from reverse osmosis system to the water inlet valve of the refrigerator should be between 35 and 120 psi (241 and827 kPa)
- Water pressure from the water supply to the reverse osmosis system should be a minimum of 40 to 60 psi (276 to 414 kPa)
- Water filter and reverse osmosis affects the water pressure
- Requirement: water pressure of between 35 and120 psi (241 and 827 kPa)
Low water pressure affects ice production. Due to low water pressure, you will have small and thin ice. In fact, lower water pressure can lead to no ice production.
That’s why make sure, the pressure of the water supply to your refrigerator is between 35 and 120 psi (241 and 827 kPa).
Turn Off Sabbath Mode
Many people are not aware of the sabbath mode. This is of special importance because in this mode your KitchenAid kfxs25ryms4 Ice maker is disabled.
So what is Sabbath mode?
Well, Sabbath mode is designed for a special group of people. In this mode, lights and dispensers are turned off including the ice maker.
Although the temperature set points remain the same, but few other functions are disabled.
You will not see any light or hear any door alarms in this mode. Even the backlight of the display screen turns off.
Here is the most frustrating thing.
The Ice maker is also disabled. However, the ICE Maker Off icon will not appear on the display screen.
If the KitchenAid kfxs25ryms4 ice maker is not working, disable the Sabbath Mode. And it is easy to turn off the Sabbath Mode. You need to press and hold the LIGHT and OPTIONS buttons at the same time for 3 seconds.
Once the Sabbath mode is deactivated, your refrigerator will return to function in Normal mode.
Using control panel
To get the maximum benefit out of your KitchenAid kfxs25ryms4, you should be able to use the control panel effectively. The display screen is located on the dispenser panel.
With this, you can access the refrigerator and freezer controls.
As we begin, you will see a blank screen on the control panel. There is nothing to worry about it. The control panel is in the “sleep mode”. But how do you activate it?
And that is simple. Touch any button to activate the screen.
It doesnt matter which button you press. Because it will not affect any function. The first touch is to activate the screen on the control panel.
Note that the control panel will go into sleep mode if no changes are made within 2 minutes.
Your Kitchenaid kfxs25ryms4 comes with a preset temperature. The optimal temperature recommended is 38°F (3°C) for the refrigerator and (-18°C) for the freeze.
Here are a few important points suggested by the manufacturer:
After setting up the new refrigerator, Kitchenaid recommends waiting 24 hours before putting any food inside. This time is enough to cool the refrigerator.
Also, after changing the temperature, it is recommended to wait another 24 hours. Because this time is long enough to make sure the overall temperature in the refrigerator changes to your desired temperature.
And if you place the food in the refrigerator that is not cool enough, your food may spoil.
Many people think that if they increase the temperature of the refrigerator, it will cool faster. But that’s not true.
Changing Temperature
You can see the temperature button on the control press. To change the temperature follow these steps:
First, activate the screen by pressing any button. Then press and hold the temperature button for 3 seconds.
Now the adjust mode is activated. In this mode, you can see the temperature information on the display on the screen. This is the Refrigerator set point.
You can change the temperature of KitchenAid kfxs25ryms4 by pressing the LOCK or OPTIONS button.
To increase the temperature, press the “LOCK” button. Similarly, to decrease the temperature, press the “OPTIONS” button.
For now, you have adjusted the refrigerator temperature. The next question comes: How you will adjust the Freezer temperature?
To change the freezer temperature, press the Temperature button again.
As mentioned earlier, the LOCK and OPTIONS buttons are to change the temperature value. You can use the LOCK button to increase the Freezer temperature and the OPTION button to decrease the Freezer temperature.
Once you are satisfied with your settings, press MEASURED FILL to save the settings
Additionally, you can also view the temperature in Celsius and Fahrenheit. Initially the temperature is displayed in Fahrenheit. To change the temperature to Celsius, you need to press the LIGHT button. And again the same LIGHT button can be used to change back to Fahrenheit
But what if you don’t want to make any changes to the temperature?
In that case, you can press ICE MODE at any time to exit. Any changes will not be saved. Also, there is another easy way. You can wait 60 seconds without pressing any button. This 60 seconds of inactivity will turn off the adjust mode without saving any changes.
Remove and Replace Ice Storage Bin
You can remove the ice storage bin by following steps:
First, hold the storage bin. Then press the release button.
At last, pull out the bin to get the ice.
Now you know removing the ice storage bin is very easy. Similarly, replacing it is easy.
Place the bin into the guide rails. Slide the storage bin into the enclosure until an audible click is heard. The sound is heard when the storage bin is properly locked in place.
Also, there is an auger driver located behind the ice bin. You may need to turn it counterclockwise to lock the ice storage bin